Monthly Archives: May 2018

DSC: A configuration is pending: quick solution

Sometimes a DSC script doesn't wor, fails silently and stays in the system, "pending". Then, when I try to run a new DSC script I get this error:


A configuration is pending. If you are in Pull mode, please run Update-DscConfiguration to pull a new configuration and apply it. If you are in Push mode, please run Start-DscConfiguration command with -Force parameter to apply a new configuration or run Start-DscConfiguration command with -UseExisting parameter to finish the existing configuration.


Normally I don't have many deployments running at the same time, so I can afford to run this powershell command:
Remove-DscConfigurationDocument -Stage Pending

This deleted all the pending DSC configurations.

How to blacklist nvidia in grub

This guide is for you, if you passed through your GPU to a VM and now you want to use it in your host and have an easy way to reboot and choose a grub entry to pass it through again.

Introduction


If you have a setup similar to mine, e.g. you want to passthrough your nvidia graphic card to your VM for gaming purposes, but you want to take advantage of your powerful GPU for your daily use in your host:

  1. first of all configure your system so that the nvidia driver is working correctly;

  2. then you can create a new entry in grub, so that when you boot you can choose it for gaming.


Assumptions


I assume that you have your system set already correctly to run a VM with GPU passthrough e.g. as explained in this very good guide: Play games in Windows on Linux! PCI passthrough quick guide.

If this is the case, vfio is loaded before any other modules, so that it can claim your GPU (if it's blacklisted), basically you should have these entries (this may vary a bit, if you use AMD or need other modules than I do) in your /etc/modules :

vfio
vfio_iommu_type1
vfio_pci
vfio_virqfd
kvm
kvm_intel
apm power_off=1

1. Configure NVIDIA


If your system is set as in the assumptions mentioned above, now you need to "de-configure" your setup, so that can use your GPU in your host. Don't worry, later you will re-add all the options you deactivate, but in a new entry in grub (see step 2).

In my case, the nouveau and nvidia drivers were blacklisted in /etc/modprobe/blacklist.conf  so I deactivated the blacklist by commenting those lines:

#blacklist nouveau
#blacklist nvidia

I also had to comment the options I added in my /etc/modprobe.d/vfio.conf :
#options vfio-pci ids=10de:13c0,10de:0fbb,8086:a12f

To make sure that the nvidia installation would detect my graphic card, I rebooted. Maybe this was not really needed, but I preferred to be safe:
sudo reboot

Installing the nvidia driver for my GTX 980 GPU was as easy as running this command:
sudo apt install nvidia-384

Now reboot and check if your nvidia graphic card works as expected.

For testing you may want to install glmark2, a tool to benchmark OpenGL:

sudo apt install glmark2

You can install steam and play some games in linux. Why playing games in a VM if you can play them directly in your host?! Try it.

2. Create an entry in grub to boot your system with GPU passthrough


I was looking for this method for a while, I even had 2 linux distros installed: one for VMs, one for my daily use. With this option, this is not needed anymore. I can have just one linux distro, but a different entry in grub to boot it with the necessary options to use my VMs.

Important: never update /boot/grub/grub.cfg , as it gets overwritten when you run the update-grub command, instead, add custom entries, as follows:

sudo pluma /etc/grub.d/40_custom

In my case, I copied the entry from /boot/grub/grub.cfg and edited as follows, to include the vfio options and to blacklist nvidia. Make sure to change the vfio pci ids with the ones of your devices you want to passthrough:
menuentry "Bionic VMs" {
	set root='hd0,gpt1'
        linux	/vmlinuz-4.15.0-20-generic root=/dev/mapper/vg0-bionic ro acpi=force apm=power_off intel_iommu=on vfio-pci.ids=10de:13c0,10de:0fbb,8086:a12f modprobe.blacklist=nouveau,nvidia,nvidia_uvm,nvidia_drm,nvidia_modeset
	initrd	/initrd.img-4.15.0-20-generic
}

Save, update grub, reboot and enjoy!
sudo update-grub
sudo reboot

Troubleshooting


If you can't see your grub menu, or it's too fast when you boot, you may customize it a bit, here how my grub is configured for me in /etc/default/grub
#GRUB_DEFAULT=3
#GRUB_HIDDEN_TIMEOUT=0
GRUB_HIDDEN_TIMEOUT_QUIET=false
GRUB_TIMEOUT=1
GRUB_DISTRIBUTOR=`lsb_release -i -s 2> /dev/null || echo Debian`
#GRUB_CMDLINE_LINUX_DEFAULT="quiet splash"
GRUB_CMDLINE_LINUX_DEFAULT="acpi=force apm=power_off intel_iommu=on"
GRUB_CMDLINE_LINUX=""
GRUB_DISABLE_OS_PROBER=true

I kept some lines commented, as sometimes I need to play with these options. I kept my timeout very low, just one second, because I want my system to boot fast, increase it if it's too fast for you and comment the GRUB_HIDDEN_TIMEOUT line, as I did. When I need to boot differently, I just keep pressing the up/down arrow keys at boot time, until I see the grub menu.

Conclusions


I hope that this guide was helpful for you, if so, consider buying a gadget at banggood using my referral link. Like this (comparing to a donation) we both benefit, you get a gadget that may be useful for you and I get something too (a little commission, but the price for you is the same).
Ubuntu guide: Dropbear SSH server to unlock LUKS encrypted PC

This guide explains how to unlock a LUKS encrypted ubuntu system via SSH. This is convenient if in example you want to turn on a server but don't have a keyboard and screen attached to it. Or if you don't have physical access to it. I assume that you know already how to set up an OpenSSH server and you know how to activate/deactivate public key login. Else read Ubuntu Help: OpenSSH Server and check more online resources.

This guide was tested with ubuntu 18.04 and ubuntu 17.10.

To connect from Windows, I used ssh from bash (if you install Git for Windows you get bash).

Open a terminal and install dropbear and busybox:

sudo apt install dropbear busybox

You will get a warning here as it completes: dropbear: WARNING: Invalid authorized_keys file, remote unlocking of cryptroot via SSH won’t work!, just ignore it for now.

Activate BUSYBOX and DROPBEAR in initramfs

sudo nano /etc/initramfs-tools/initramfs.conf

Change BUSYBOX=auto  to option to BUSYBOX=y  and add (below it or at the end of the file) this line:
DROPBEAR=y

Browse to the /etc/dropbear-initramfs/ directory, which includes all the dropbear configurations needed to be included in the initramfs:

cd /etc/dropbear-initramfs/

Note: host keys are already present, as they were automatically generated during the installation of the dropbear package, so there is no need to create new ones as other guides tell you to do. Just convert the rsa one, as follows:
sudo /usr/lib/dropbear/dropbearconvert dropbear openssh dropbear_rsa_host_key id_rsa
sudo dropbearkey -y -f dropbear_rsa_host_key |grep "^ssh-rsa " > id_rsa.pub

Add your client public key to the authorized_keys. If you are logged to your machine via SSH, and your public key is already in your authorized_keys file, you can copy the existing authorized_keys file, as follows:
cp ~/.ssh/authorized_keys .

Else you can add a public key as follows: sudo echo “your public key” >> authorized_keys 

Set dropbear to start:

sudo nano /etc/default/dropbear

Change NO_START=1  to NO_START=0 

In dropbear, use a different port from the one you are using in your host, so you won’t get the annoying "man in the middle attack" warning in your ssh client that will notice that the host has different keys. Different ports are considered different hosts, so you won’t get any warning at all. I’ve seen other complicated solutions to avoid the warning, but I think that using a different port is the easiest and most elegant solution.

sudo nano /etc/dropbear-initramfs/config

Uncomment the DROPBEAR_OPTIONS  line and add the option to specify the port. In this example I use port 21. Use the port you desire.
DROPBEAR_OPTIONS="-p 21"

Now add the script that will be needed to actually unlock your LUKS partition:
sudo nano /etc/initramfs-tools/hooks/crypt_unlock.sh

Copy and paste the contents from gusennan' sh script in the file (or copy the text from the raw file), then give it executable rights:
sudo chmod +x /etc/initramfs-tools/hooks/crypt_unlock.sh

Update initramfs:
sudo update-initramfs -u

Disable the dropbear service on boot, so it won't interfere with your openssh server:
sudo systemctl disable dropbear

ImportantI had to update grub and disable the splash screen, because with splash active, after connecting to dropbear and typing unlock the screen was blocked and I could not enter the LUKS password.
sudo nano /etc/default/grub

In the GRUB_CMDLINE_LINUX_DEFAULT line, replace "quiet slash"  with "quiet" , as follows:
GRUB_CMDLINE_LINUX_DEFAULT="quiet"

Save and update grub:
sudo update-grub

Reboot your server:
sudo reboot

Try to connect to your machine. You must use the root user, and specify the port you configured in the previous step:
ssh root@YOURSERVER -p 21

Once connected you will see something like this:
Warning: Permanently added '[YOURSERVER]:22,[YOURIP]:22' (ECDSA) to the list of known hosts.
To unlock root partition, and maybe others like swap, run `cryptroot-unlock`
To unlock root-partition run unlock

BusyBox v1.22.1 (Ubuntu 1:1.22.0-19ubuntu2) built-in shell (ash) Enter 'help' for a list of built-in commands.


type unlock , insert your LUKS password, if everything worked correctly your partition will decrypt and your machine will boot. You will see this:
...a bunch of other info...
Connection to 192.168.0.xx closed.

Give it time to boot, then you can finally ssh into your linux box, as usual.

Encrypted HOME directory


If not only your partition is encrypted, but also your home directory, you won't be able to login with your public key, as the public key is saved in ~/.ssh/authorized_keys , which is encrypted.

To solve this, follow Stephen's Encrypted Home directories + SSH Key Authentication guide.

Troubleshooting


If you get this error when you try to connect to your server, it's because you didn't follow my advise to change port in dropbear:
ssh root|youruser@YOURSERVER
@@@@@@@@@@@@@@@@@@@@@@@@@@@@@@@@@@@@@@@@@@@@@@@@@@@@@@@@@@@
@	WARNING: REMOTE HOST IDENTIFICATION HAS CHANGED! 	@
@@@@@@@@@@@@@@@@@@@@@@@@@@@@@@@@@@@@@@@@@@@@@@@@@@@@@@@@@@@
IT IS POSSIBLE THAT SOMEONE IS DOING SOMETHING NASTY!
Someone could be eavesdropping on you right now (man-in-the-middle attack)!
It is also possible that a host key has just been changed.
The fingerprint for the ECDSA key sent by the remote host is
SHA256:m/************/****.
Please contact your system administrator.
Add correct host key in /home/youruser/.ssh/known_hosts to get rid of this message.
Offending ECDSA key in /home/youruser/.ssh/known_hosts:12
  remove with:
  ssh-keygen -f "/home/youruser/.ssh/known_hosts" -R "YOURSERVER"
ECDSA host key for YOURSERVER has changed and you have requested strict checking.
Host key verification failed.

I still prefer my solution, but if you insist on using the same port, here a few nerdy solutions:

Solution 1, works like a charm in linux, but not really on bash on windows.

Solution 2, provide some command line hack to avoid the warning:

ssh -o UserKnownHostsFile=/dev/null -o StrictHostKeyChecking=no youruser|root@YOURHOST -p YOURPORT

Credits


This guide was inspired by: https://oliverviebrooks.com/2017/12/05/unlocking-luks-volumes-without-local-access/

Thanks also to Stephen (link above) for his encrypted home directories solution.

I hope that this guide was helpful for you, if so, consider buying a gadget at banggood using my referral link. Like this (comparing to a donation) we both benefit, you get a gadget that may be useful for you and I get something too (a little commission, but the price for you is the same).
Change Docker images location in Windows

One of the things I wish I knew before using Docker for Windows, is that configuring where images and containers are stored is not really straight-forward. Here how to change the default location from C:\\ProgramData\\Docker to whatever drive and folder you like. In my case I like to keep the same structure, but in D:, like this: D:\\ProgramData\\Docker

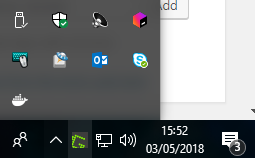
To change the location via UI, from your system tray, right click on the docker (the whale) icon:

Note, this assumes that you are using Docker from the "stable" channel. With "edge" I think you may not have the "Daemon" option as in the screenshot, then keep reading to change the file manually.

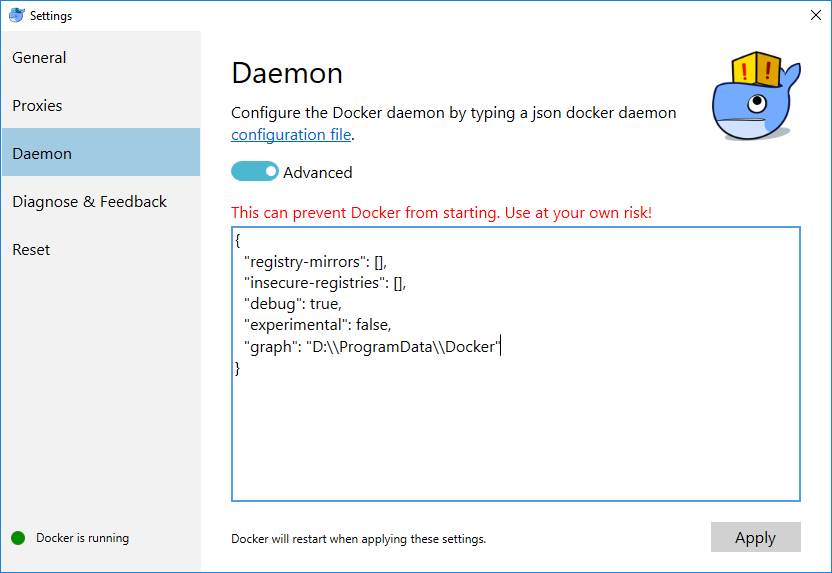
Then from the menu, select "Settings..." > "Daemon" > click on the "Advanced" switch > Add (notice that every backslash is escaped with another backslash), feel free to change the location to your desired one:

"graph": "D:\\\\ProgramData\\\\Docker"

The result should look like this:

Click "Apply", docker will restart and you are set.

Alternatively you can edit the C:\\ProgramData\\Docker\\config\\daemon.json file and add the "graph" property with your favorite text editor, then save and restart the docker service.

To restart docker: right click on the docker icon > at the bottom click on "Restart".

Unluckily, the old images will stay in the old location and it's up to you to manually delete them after restarting docker. They are inside C:\\ProgramData\\Docker\\windowsfilter

I'm not sure if you can simply move them to the new location. I didn't bother. I tried to copy the files from windowsfilter but got some errors and saw that some links were not copied correctly, so I gave up and simply built my docker files to generate a new, clean images and containers from scratch.

Ubuntu: how to prevent grub installation

I have several linux installations in my system, and I like to control the only boot partition from my main linux distro.

Sometimes I need to update the kernel image in my secondary linux distros, but apt tries to install grub. I don't want that. I often had to let it be installed and remove it via apt remove.

A better, permanent solution is to add this file preferences.

Thanks to: jdthood answer in stackoverflow.